

I just got a job at the movie theater, so I'm going to have to see how this affects my posting. (I know, it's slowed down already, but money's a bit tight to be making random things...which this job will help with! XD)
Anyway, just thought I'd mention it, so you know I'm not dead or anything ;)
Tuesday, February 23
Hmmm...
Thursday, February 18
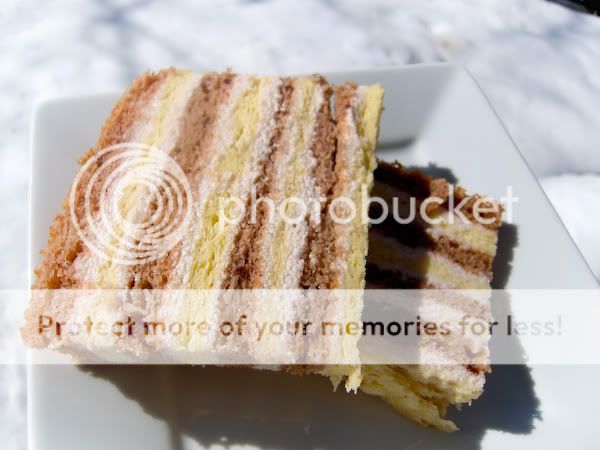
Chocolate & Vanilla Sponge Cake with Strawberry Buttercream
Yet another mouthful, ha.
After a string of unsuccessful submissions to foodgawker and tastespotting, I wanted to make something that was visually stunning. (and not impossible to execute, haha) Stumbling through the food blogosphere (oh how I hate that term, haha), I came upon this cake.
I made some changes, and had to improvise (as English isn't the blogger's native language, and some things weren't entirely clear)
Anyway, it's really pretty, but there's too much frosting between the layers for me, so I'd either put less in between each (which would make the frosting less visible :( ), or make the layers thicker and just have 4 instead of 8 (which is also less pretty). But if you're a big frosting fan (and it IS good), then just go ahead and use as much as you want.
I definitely think one of the keys to the beauty of the cake is the clean lines, so definitely try to bake the layers evenly, and to trim the sides of the cake.


Sponge cake recipe:
Adapted from Cafe Chocolada
6 eggs, separated.
1 cup sugar
3/4 cup oil
3/4 cup milk
1 cup flour
4 tsp baking powder
1 tsp vanilla
2 tsp cocoa powder
Preheat oven to 395 degrees Fahrenheit (Yup!)
Line a pan or two (I only had one -___-)with parchment paper, and lightly spray with nonstick spray. I used a half sheet pan (so I could just cut the one layer into 4 pieces), but you can use any sort of pan you want, and just split the layers in half.
Beat the eggs whites until stiff. While that's happening, whisk together the yolks and the sugar, until thick and lighter in color. Whisk the yolks into the whites.
Then add in the oil, vanilla, milk, flour, and baking powder and mix until totally combined (the oil is tough, but whisking helps instead of just using a spoon or spatula).
Put half of the batter (don't freak out if it's all bubbly and rising) into the pan, making sure to level it really well. While that's baking (for about 10-15 minutes), put 2 tsps of cocoa powder into the remaining batter. Make sure there's no clumps or it's really hard to incorporate.
Bake that cake.
Once the cakes cool, peel off the parchment paper and cut them in whatever desired shape. I wrapped them up and stuck them in the freezer while I made the frosting.
Strawberry Buttercream Frosting: (not my swiss stuff! haha)
1 cup milk
1/4 c flour
1/4 c sugar
1/3 c strawberry puree (I used the juice from some frozen strawberries)
1 stick of unsalted butter, softened.
Combine 1/2 cup of the milk with the flour, and heat slightly over medium heat, whisking. When it starts to thicken a little, take it off the heat. Bring the rest of the milk to a boil, with the sugar and the strawberry puree. Turn the heat to medium-low, and add in the flour/milk mixture. Whisk it continuously, cooking it until it's thick.
Take it off the heat and let it cook completely.
Then, beat in the butter.
My cake assembly:
I cut each cake into 4 equal pieces and stuck them in the freezer while I made the frosting. After layering the cake + frosting, I set the cake in the fridge overnight, and then trimmed off the edges to make a nice rectangle.
Bring it to room temperature before serving. :)
Thursday, February 11
Kiwi Curd Tarts with Strawberry Mousse: A Mouthful in More Ways Than One
Good grief, that was a long title. XD
At the store the other day (you know, stocking up before the big storm), I grabbed a few kiwis because...well, just because. You know how that is, wandering around the produce section and randomly deciding to get something, even though you have no clue what you'll use it in.
When I got back, I started looking through cookbooks, just to get an idea of something to do, and I saw this recipe for a lemon curd tart.
I'm sure we can all make the OBVIOUS leap from lemon to kiwi, and so to kiwi curd, haha.
I wasn't entirely sure if it was possible, and a quick google search was less than fruitful (pun originally not intended.)
So I figured I'd replace the lemon juice with kiwi puree + a liiiiittle bit of lemon juice. I couldn't quite tell that it was kiwi I was tasting, but it was definitely different from a regular lemon curd.
UNFORTUNATELY, when developing your own recipes/methods, timing is very important...By the time the tarts were fully cooked, the crust was rather dark...which was sad. But honestly, it was really good, a nice carmelized flavor. And the method of making it is like a cookie, so...that's how it tastes. Next time I'll probably not prebake them, so I'm going to add that into the recipe.
Then, just to make them prettier, I added a strawberry mousse topping. Strawberry kiwi used to be my favorite Capri Sun flavor when I was a kid, hahaha, so it seemed fitting.
Both of these recipes are fairly labor intensive, but it was definitely worth it. :)
Strawberry mousse with blueberries
Mostly done kiwi curd tarts
They may look burned, but they were actually really good (and no burned taste! haha)
See? Yummy
The mousse was perfect with the curd :)
Kiwi Curd Tarts:
[Crust]
8 Tbsp butter
3/4 cup sugar
1 large egg yolk
1 cup flour
pinch of salt
Cream together the butter and sugar until light and fluffy. Add the yolk, and beat for about 2 more minutes. Beat in the dry ingredients on a low speed. Form into a disc and refrigerate for at least 2 hours.
Now you can either make about a dozen mini tarts (I use my cupcake tin) or one big one. Either way, shape the crust in whatever tin you use, and stick it in the freezer or the fridge for a bit (it's a VERY soft dough)
[Kiwi Curd]
(This makes much more than I used for the recipe, but it's just easier this way)
1/2 cup of strained kiwi puree
6 egg yolks
juice from 1/2 a lemon
1 egg
1/2 cup of sugar
pinch of salt
8 tbsp butter.
Over a double boiler or a bain marie or whatever you use for stuff like that, whisk together the yolks, egg, and sugar. Add the vanilla, puree and the salt and whisk it until it's really really thick and lightened considerably in color. (trust me, you'll know when it's done).
Strain it and let it cool until it's just barely warm to the touch. Then, whisk in the butter.
Spoon the curd into the prepared crust and bake at 325 degrees Fahrenheit for about 15 minutes, but depending upon the size/thickness of the shape you choose, it may take longer. Cook it until the center is set (stick a toothpick or something in the middle, if it's clean, it's good).
Let cooooool.
Now, if you want, you can top it with strawberry mousse, or whipped cream or anything.
Strawberry Mousse:
(this also makes more than I used for the tarts, but it taste great on its own anyway, hehe)
1 tsp gelatin
2 tbsp cold water
3/4 cup of milk
1/2 tsp vanilla
2 egg yolks
1 1/2 tbsp sugar
1 1/2 tbsp corn starch
1/4 cup of strained strawberry puree
1 cup of whipped cream
Bloom the gelatin over the cold water.
Boil the milk and vanilla. While that's happening, whisk together the egg yolk, sugar, and cornstarch. Carefully stream the hot milk in to the yolks, whisking furiously the whole time. (don't want to scramble the eggs). Cook the mixture until it's thick (which should not take long. I put the pot on the stove, turned to get the puree from the fridge, and when I got back to the stove, it was thick!). Whisk in the puree and cook for about 30 seconds. Then add in the gelatin, making sure it's totally melted in the mixture. When it's cool, fold it into the whipped cream.
Top the tarts with it, or pipe (or spoon) it into glasses and let it set in the fridge for an hour or so.
Enjoy! (it tastes like ice cream, yum!)
[also, I'm pretty sure I got everything, but if anything's unclear, don't hesitate to ask me!]
Monday, February 8
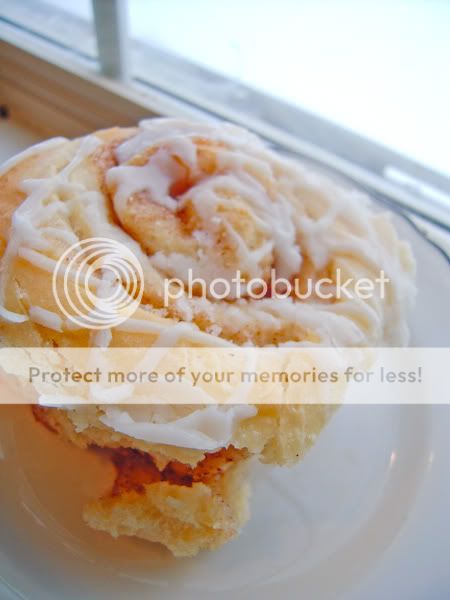
Snowpocalyptic Cinnamon Rolls
Okay, so if you live in the the eastern United States, especially the mid-atlantic, you're well aware of the chaos that occurred outside.
It snowed.
I know, crazy, right?
No, it didn't JUST snow. It was ridiculous. I don't know the last time Virginia's gotten this much snow. It was definitely at least 2 feet in places. With my mother heading off to work in Maryland at 2 AM, I knew I'd have to help my poor old father (haha) shovel the aftermath.
At around 3 am, I got the brilliant idea of starting some cinnamon rolls to surprise him.
While I waited for the dough to rise, I got some pictures of the sunrise (okay, well a little off, since the sun rises to the right of our house, where there are no windows haha) through the snow covered trees.

I shoveled from the front door to the garage, then posed for a picture
It's okay, you're allowed to think I'm kinda awesome.
Then I complained a lot and went inside. I have a short attention span when it comes to menial labor XD Luckily for Dad, a neighbor has a snowblower that he let him borrow. Yay, neighbors! :)
ANYWAY, I suppose you would like a recipe and some pictures of cinnamon rolls, yes? Fine, fine.


I halved this, by the way, since it was just me and Dad
Cinnamon Rolls:
6 tbsp granulated sugar
5 tbsp butter, room temperature
1 teaspoon of salt
1 egg, beaten
2 tsp yeast
3.5-4 cups of flour
1 cup of milk (either room temperature, or slightly warm..not hot!)
2-4 tbsp of melted or very soft butter
1/2-3/4 cup of cinnamon sugar mixture (you can combine them in any ratio you want, and you can add as little or as much as you want, really)
Cream together the butter, sugar, and salt. Add in the egg and beat until smooth.
Add in the yeast, flour and milk. Mix it until it forms kind of a ball.
If you have a standing mixer with a dough hook, switch to that afterward and let it go on medium speed for about 10 minutes. If not, well, oil or flour your hands very well and knead, because this dough is a bit sticky.
Put the dough into an oiled bowl, cover, and let it rise for 2 hours, or until it's doubled in size.
Roll out the dough(thickness is up to you :) ) and spread the melted or softened butter on it. Sprinkled the cinnamon sugar all over it, and tightly roll it up. Cut 1-2 inch rolls, depending on the dimensions on the pan you bake them in. Let them rise for another hour to an hour and a half. Alternatively, you can wrap them and let them rise in the fridge overnight.
Preheat the oven to 350 degrees Fahrenheit.
Bake the rolls for about 20-30 minutes
Drizzle (or drench, hehe) a glaze made of milk, powdered sugar, and vanilla over them. (It's difficult to give a recipe for the glaze, because I swear, I can use the same measurements each time and get a different consistency. Just make sure to add the milk to the sugar little by little. It's very easy to get a glaze that's too thin)
Enjoy! :)
Tuesday, February 2
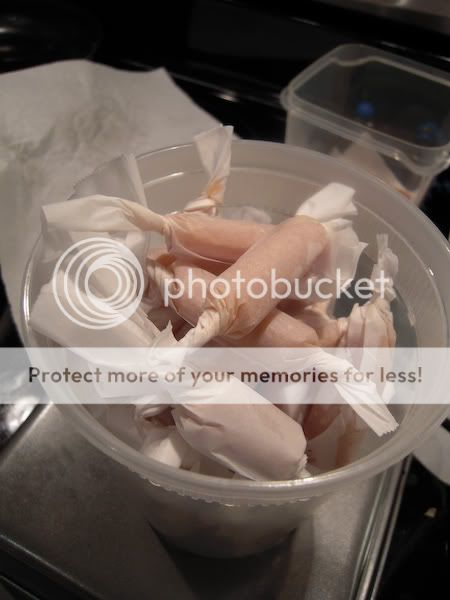
Smoked Sea Salt Caramels
Oh my gosh.
3 attempts at making caramels in as many days.
The first time, I tried to make pecan caramels, and when I went to cut the pieces, I discovered that the candy was rock hard.
THUD!
...is the sound it made hitting the bottom of the trash can.
The second time, something went HORRIBLY WRONG, and I ended up with a grainy caramel sauce.
Down the drain that monstrosity went.
So today (well, yesterday, as it's 2 AM as I'm writing this) I decided to spend money on a digital thermometer (I had a simple dial one before) before I wasted any more sugar and cream.
And guess what....
SUCCESS.
I figured I had temperature issues, but I'm just glad I finally figured it out, because now I can experiment.
I really wanted to get this right,because I've been neglecting this poor poor blog,and I needed SOMETHING to tell y'all.
:P
Anyway, onto pictures and the recipe.


The various stages of the caramel.

Dad begrudgingly helping me cut caramels. :P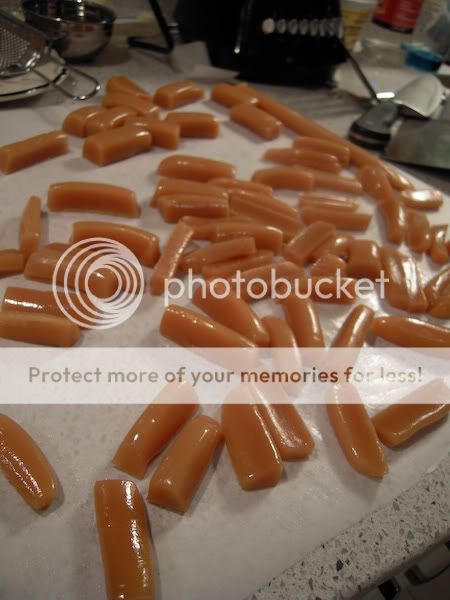

SALT!

SO MANY PICTURES :D
Smoked Sea Salt Caramels:
2 cups sugar
1 cup corn syrup
1 cup heavy cream
1 cup whole milk
1 tsp salt (regular table salt)
4 tbs butter
and a couple tablespoons of flaky sea salt for decoration (I used smoked, but you can use any kind, really)
Prepare either an 8x8 or 9x9 pan (depends on how thick you want them) by lightly coating it in nonstick spray, and then placing a long strip of parchment paper in the bottom (like in my picture)
Put the sugar, corn syrup, table salt, and 1/2 cup of the cream + 1/2 cup of the milk into a heavy pot.
Stir this constantly over medium heat until it boils.
Once it boils, and the rest of the cream and milk in a really really thin stream (If you dump it all in, it'll lower the temperature too quickly, and you'll have to wait for it to get back up to a boil again).
Reduce the head to medium-low and boil for about 5 minutes. DON'T STIR IT.
Add the butter one tablespoon at a time, stirring the mixture to help it melt.
Clip your thermometer to the side of the pot at this point.
Continue to boil it, stirring occasionally, until it reaches 250 degrees Fahrenheit.
While this is happening, take a wet pastry brush and wet down the sides of the pan to prevent those pesky seed crystals from dropping in and ruining your caramel.
I really hope you have a reliable thermometer, but if you don't, check the caramel, by dropping a bit into ice cold water. When you pick it up, if it's a ball that holds it's shape, but does give when you press it, it's ready. If it's hard...well, you've gone too far :(
Anyhoo, this should take about 30 minutes. Don't be tempted to turn the heat up higher to make it faster, it's really easy to burn caramel (I should know >___>)
Once it's at 250, pour the caramel into the pan, but don't scrape the sides into the pan. Let it cool for 4 hours and then cut with an oiled knife, press into the salt (put in on a plate) and wrap. :D
Now try not to give yourself cavities :P
Subscribe to:
Posts (Atom)

