

So I know I've been awful, but school's been crazy.
And I've also decided something.
I'm going to culinary school!
Well, first I'm leaving VCU and working so I can afford my uniform and various kits (I've got knives, but they're all chipped because /someone/ ran them through the dishwasher T____T )
And then in summer, hopefully, I'll be in the culinary arts program at J Sarge, and the pastry arts program after that :)
And so hopefully, that will give me new things to post here, especially sine I'll probably want to practice some things.
WOOH LIFE CHANGES!
Haha. But yeah, I think the universe was sending me signs that what I'm doing now is not what I'm supposed to be doing. So I'm trying to listen to those signs and change courses.
I think I'll look cute in a chef's coat, checkered pants, and toque :3
Sunday, December 12
oof!
Wednesday, November 17
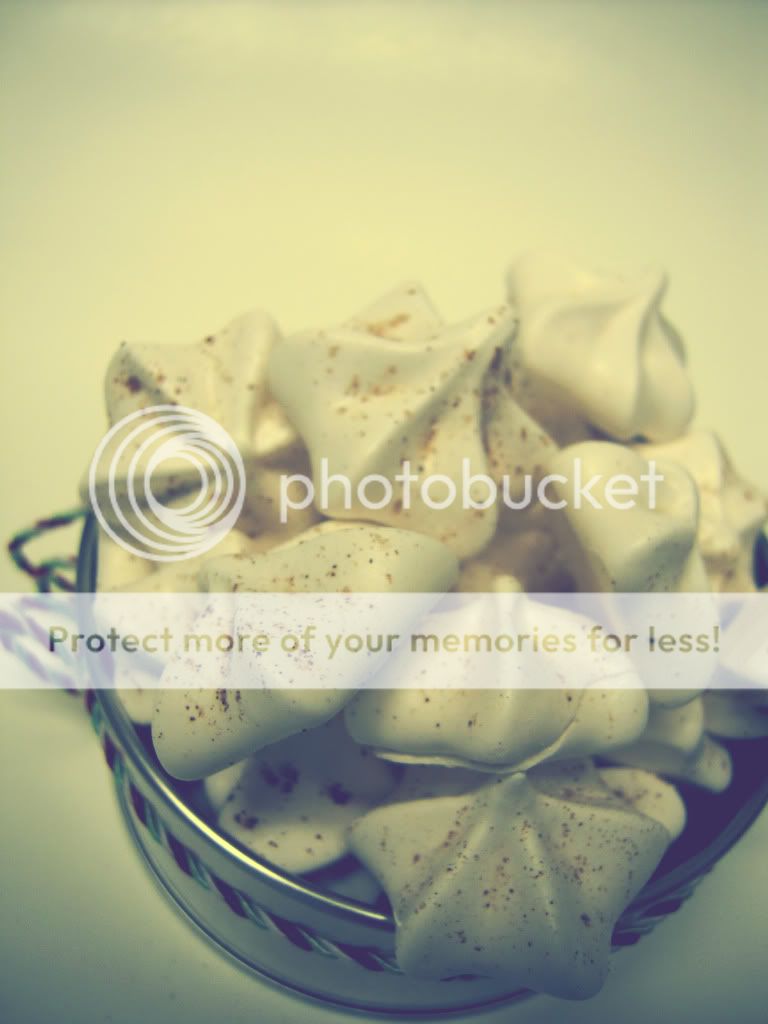
Pumpkin Pie Spice Meringues!
You know, every time I go to type "meringue", I always want to type "merengue" instead.
Interesting Kiara Tidbit o' the Day! XD
Anyhoooo. Last night, I whipped egg whites by hand for an hour while watching TV, because my mixer bowl was dirty and I figured I could use the exercise.
I have poor decision-making skills, obviously.
Anyway, here are pictures, and the recipe! :)
I couldn't decide which I liked better XD
Pumpkin Pie Spice Meringues:
1 cup granulated sugar
3 egg whites
1 tsp of vinegar (or cream of tartar. You need acid, that's all :) )
1 tbs pumpkin pie spice (cinnamon, nutmeg, cloves, ginger)
Tiny dab of orange food coloring.
Preheat the oven to 200 degrees Fahrenheit. This won't take long, so I'd do it when you're almost done whipping the egg whites.
Whip the egg whites until frothy, then slowly add in the sugar.
Then add the vinegar and spices, and continue to whip.
When it gets to soft peaks, add in the food coloring.
Whip whip whip whip whip until they're stiff, glossy peaks. (they'll hold their shape when you lift the whisk straight up, the tip should curl over , but it should be a defined peak)
You can either just put the meringue into a sandwich baggie and cut the tip off and pipe little blobs, or put a nice tip in a pastry bag. I used a Wilton 1M for mine.
Now the baking time really depends on your oven and the size of the meringues, so the first time you make them, I'd suggest making a small test batch (if you have time), or to at least make more than you need, so you can break a couple open and check if they're done.
For me, personally, these needed about an hour. Generally, they'll take between that and 2 hours, but like I said, it depends on their size, and your particular oven. :)
Tuesday, November 16
Funny Story.
Okay, not really.
But I tried to make macarons.
They were epic fail. (I'm unsurprised)
I was going to take pictures anyway, but my camera's battery died.
And I can't find the charger.
Obviously, the universe wants to spare you from the horror of seeing such ugly creations.
You're welcome.
XD
Sunday, November 7

Monday, October 11
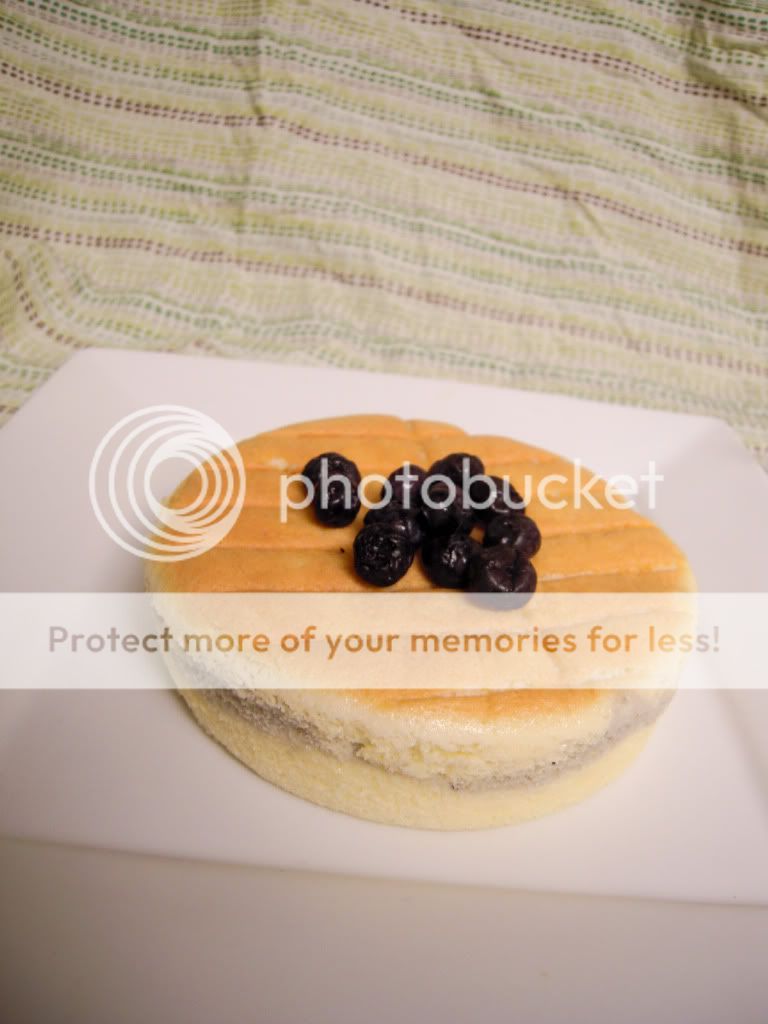
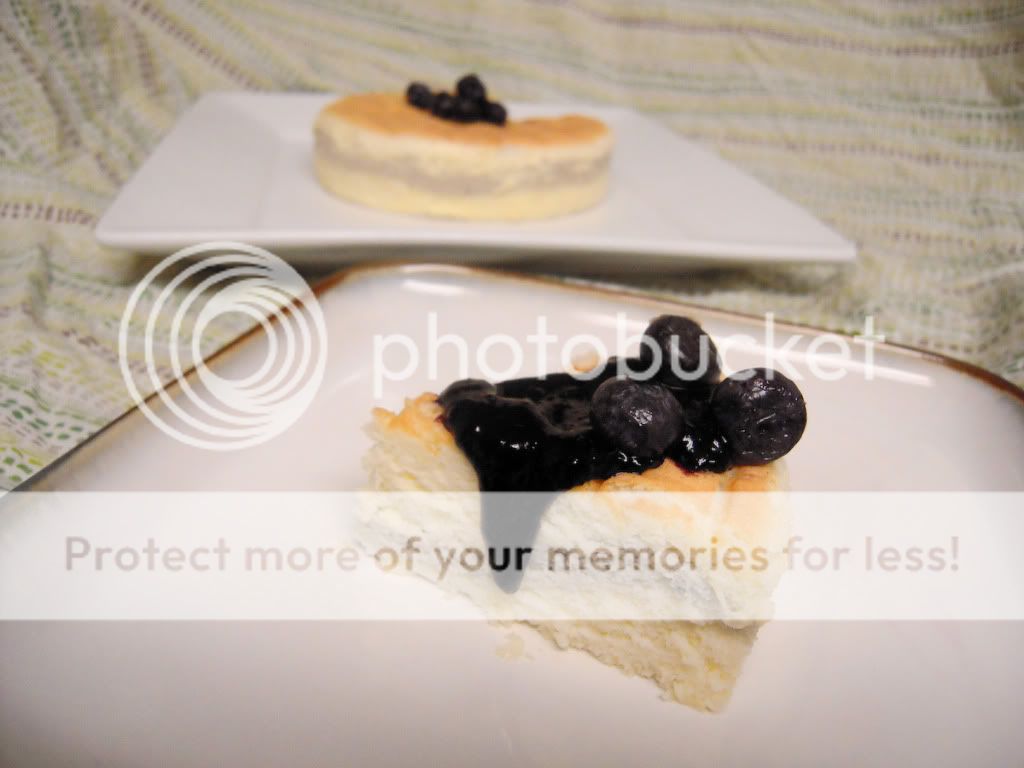
Blueberry Japanese Cheesecake
Ooooooh.
I love cheesecake.
It's pretty odd how much I love cheesecake, considering that I'm not a fan of cold cheese...but I guess cream cheese is in a category of its own.
Japanese cheesecake is the child of a beautiful affair between cheesecake and sponge cake, haha. It's so light and fluffy, but still manages to taste like cheesecake, and even have that same creaminess.
I tried to make it once before, but that was a flop. I don't quite remember what was wrong, but trust me...it was wrong. XD
Anyhoo, I'm not feeling too well today :( so I'm just gonna get right to the pictures and the recipe.

 (just to show you my tin floating in its bath, haha)
Japanese Cotton Cheesecake w/ Blueberry layering:
4 ounces of room temperature cream cheese.
1.5 tablespoons of butter
2.5 tablespoons of heavy cream
1/2 cup of granulated sugar
3 eggs, separated
1/4 teaspoon of cream of tartar
1/3 cup of flour
1 tsp baking powder
2 tablespoons of blueberry sauce (literally just cook and squish the berries over medium heat, and strain)
Place a tray in the oven, filled with an inch of water, large enough to hold your pan. (I used a 6 inch pan for this recipe). If you're using a springform pan for your cheesecake, be sure to wrap the outside in foil so the water doesn't seep in.
Melt the butter and cream cheese with the cream over medium-low heat, stirring occasionally. Stir until it's completely smooth, then set it aside to cool.
Once it's cool, whisk in the yolks.
Mix the flour and baking powder into the cream cheese mixture, being careful to not overmix it.
Depending on how much of the blueberry you want, divide the batter into 2 (i did 1/3 and 2/3), and mix the blueberry sauce into one part.
Meanwhile, whisk the egg whites with the cream of tartar until frothy. Then add the sugar, a few tablespoons at a time, while whisking the egg. Continue until the whites are medium peaks. Fold the egg white into both mixtures, and pour it into the pan. (I did half of the plain, then the blueberry, then the rest of the plain)
Carefully set the pan into the hot water bath, and bake it for 50-60 minutes. Don't open the oven until it's close to ready! When you think it's ready, the top should be a nice brown, and do the toothpick test (stick a toothpick in the middle of the cake, and if it comes out clean, you're good)
Immediately turn the cake out onto a cooling rack and let it cool for 30 minutes. Then wrap it and place it in the fridge until you're ready to serve it.
Serve with whipped cream and/or extra blueberry sauce. (I think the unsweetened juice is a really nice contrast to the sweet cake :D )
Saturday, October 9
Mini Fall Cookies!
So the muffins were good...still not exactly what I was looking for in a muffin, so I'll hold off on posting those for now.
Buuuuut, I do have more cookies to share!
These are mini cookies shaped like oak leaves, maple leaves, pumpkins and acorns.
I have learned, through a couple of days of decorating mini cookies, that they are 5 billion times more work than regular cookies. So much less room to work on, and just so /many/ to do in the first place.
But they're so cute! So I think I'm going to have to get mini cutters for every season...like I don't have enough cookie cutters as it is...my storage drawers are almost full, haha.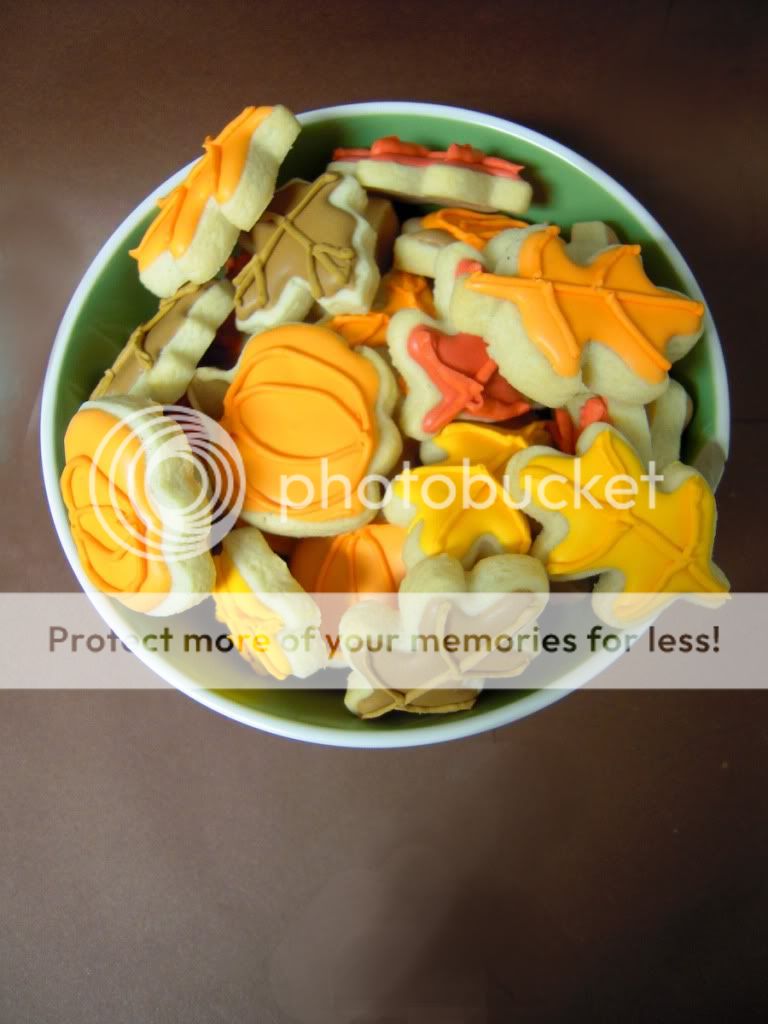


Just like the Halloween ones, you can make 'em yourself
or I can make them for you :)
I am worn out. Hahaha.
Friday, October 8
Mini halloween cookies
I know, I know, I'm horrible.
T_T
I've been so busy with school and my etsy store that I hardly have time (or money!) to bake for myself, or for the blog.
I apologize...and I bring you an offering!
Yummy mini Halloween cookies!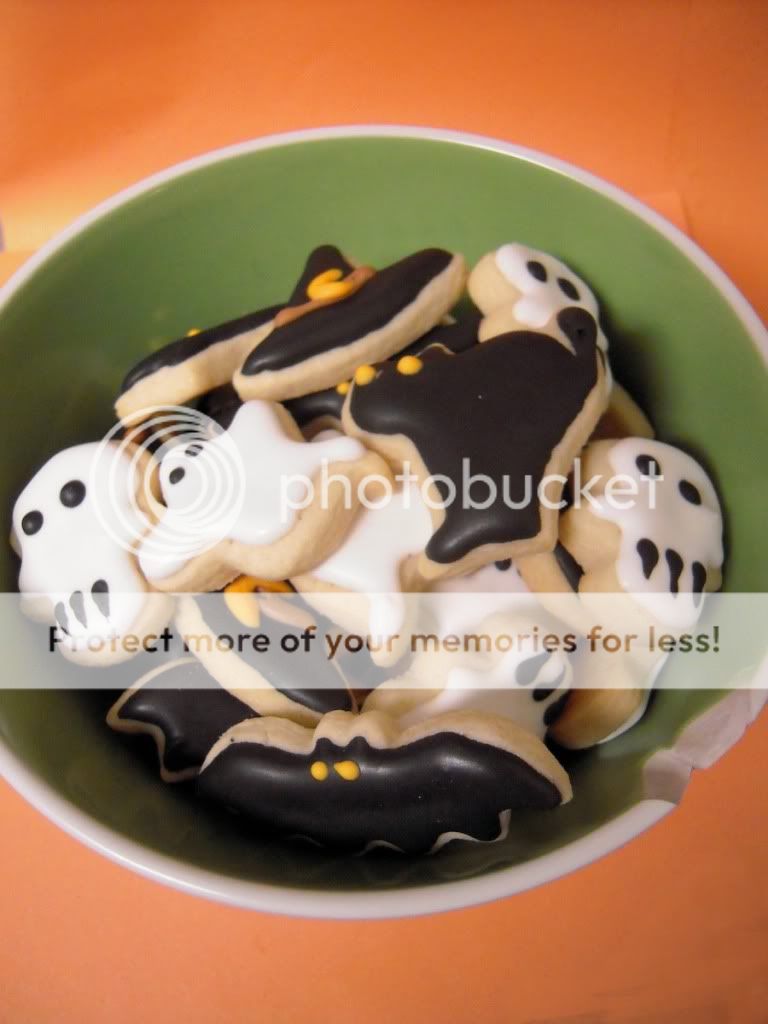
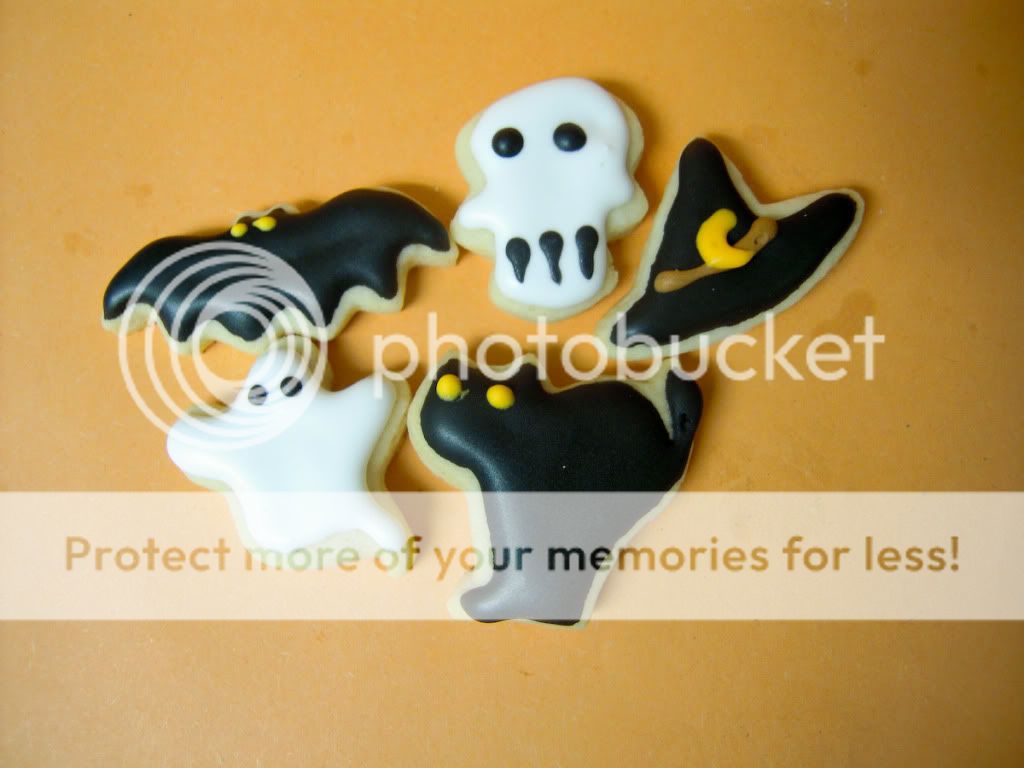
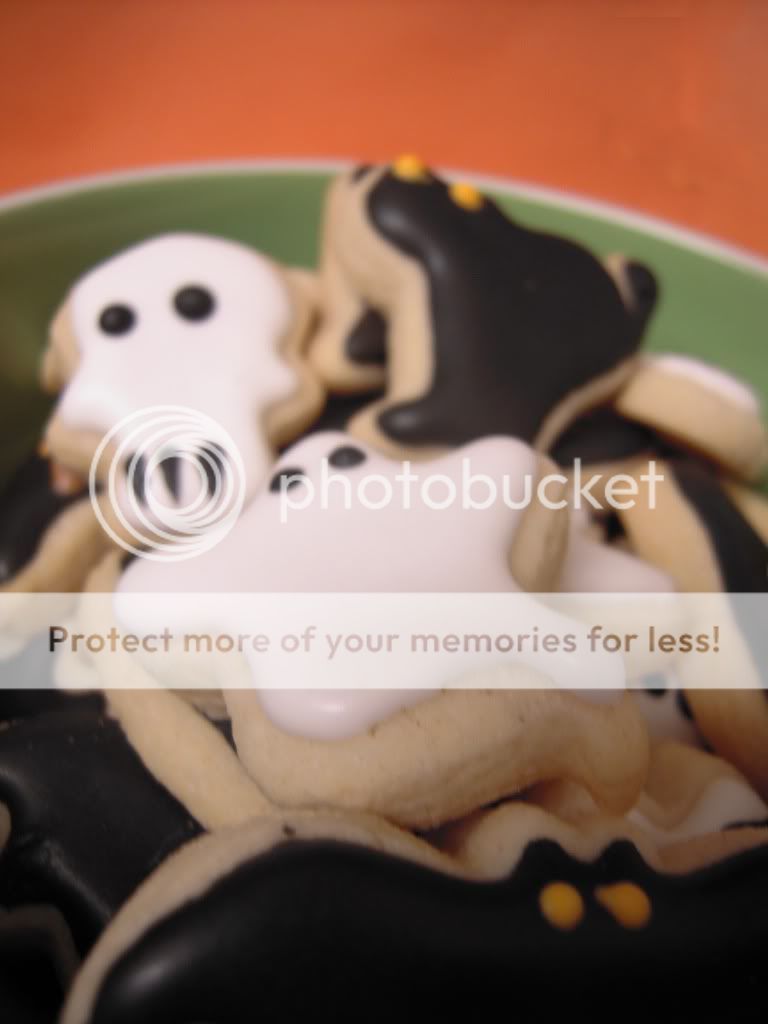
Recipe is here, if you wanna take a stab at them yourself.
Iiiiiiiif you're not up to that, you can buy them from me!
Mini Halloween Cookies @ flour on her nose on Etsy
I should have a post about blueberry muffins (yuuum!) up tomorrow...sorry I've been such a bum, hahaha. :P
Sunday, September 5
WINNER!...
...s
:O
Yeah, I'm feeling nice, so I drew 2 more names, and those two people will get a free lollipop each :)
So, here are the results.

I'll be contacting you guys!
Thursday, September 2
Okay, here's the deal.
I've decided that I'm going to try to post what I had for dinner EVERY NIGHT.
NO MATTER HOW MUNDANE (mmmm, 6 boiled eggs) OR HOW UNHEALTHY (just a plate of french fries ^_^ ) OR EVEN IF I DIDN'T MAKE IT (awww yeah, Chick-fil-A XD)
That will make me spend more time on the blog...I promise.
Haha.
Sunday, August 22
What's this? Some sort of...giveaway...?
So I’ve decided to hold a giveaway!
That’s right, lovely readers, you can be the lucky recipient of one dozen lollipops made by yours truly. (random flavors, because who doesn’t like a sweet surprise? ;) )
The rules? Simple:
You must be a resident of the United States or Canada. (sorry to all my international readers :( I hope to do a worldwide giveaway in the future!)
To enter, you must:
Comment on this blog post telling me your FAVORITE candy flavor
To earn up to three additional entries:
- Follow me on twitter, and comment here with your username.
- Retweet my giveaway tweet on twitter (haha!), and include your username in your comment.
- Become a fan of flour on her nose on Facebook, and post your name here OR share this post on Facebook and post your name here (or both facebook methods, but only one method counts as an entry :P )
All entries may be contained in one comment, as long as it's clear which names go with which methods :)
No worries, if you already follow me/are a fan, just be sure to include your username/name in the post :)
You have until Saturday, September 4th, at 11:59 PM eastern time to post here with your entries.
I’ll announce the winner on the 5th, so check back here, or leave a contact method so I can tell you directly :)
Once the winner is announced, please email me at ksmall4@gmail.com, so I can get your shipping info :)
Good luck! :D
(due to the nature of the prize, please give me a couple weeks to get it to you ;) )
Monday, August 16
Blah.
So I'm all moved in to my new apartment. :)
I don't know what to bake first in here!
Also, in case you haven't seen, here's my threadcakes entry XD
Monday, August 2
sigh.
I must apologize to you all.
Due to life and everything, it's been difficult to blog. I really only bake for my etsy store anymore. I'm rather hoping that once I move to my apartment at school (on the 13th! wooh!) I'll be able to blog more. (I will live a block away from the grocery store again ;) )
But in the meantime, if you want any cookies or lollies, visit flour on her nose on etsy (especially if you're about to get married...I just got a set of wedding themed cookie cutters that are perfect for wedding or shower favors. :D )
Tuesday, June 29
Heyyyyyy
Have you ever wanted to buy the cookies you see on here?
Welllllll, now you can!
Just click here!
:)
Don't be afraid to get custom orders!
Enter flouronhernoseblog at checkout and get 10% off your order! (refunded through paypal after you pay, etsty doesn't handle discounts at all >< )
Friday, June 18
Lollipops and Caramels!
Oh my gosh. I'm sorry.
It's been a crazy month, and life will continue to be crazy until August.
I've been working, going to Richmond, and trying to get everything together for my etsy shop.
Speaking of which, I do have a single listing up there...for some lollipops. :) So check it out! In August, I'll start the cookies and other various candies.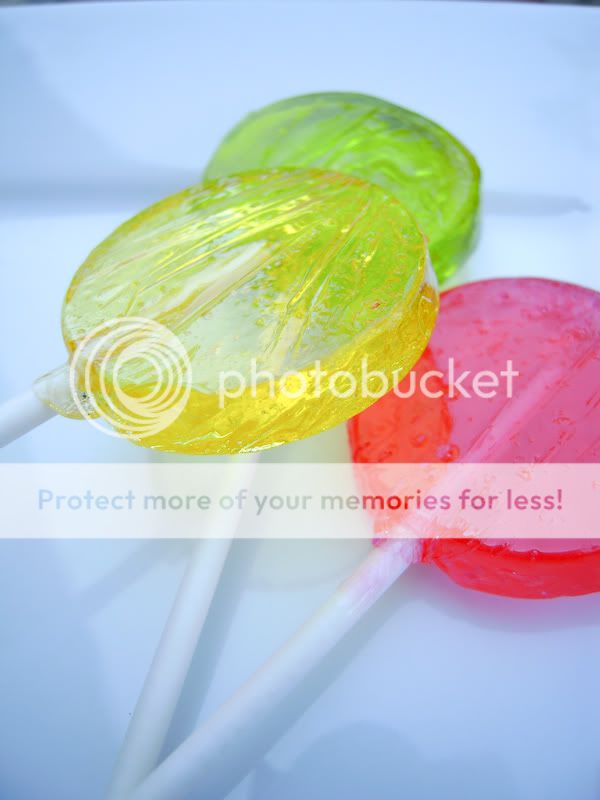

And speaking of those various candies...how about some caramels that I had to make for my family reunion? You guys remember those salted caramels I made a while ago, right?
Well, I just took that recipe, and poured it over chopped pecans. Delicious! And then I dipped some in chocolate.


Here's the recipe again: Caramel!
To make them like I did this time, chop up enough nuts (whatever kind you want, they all taste good with it) to cover the bottom of your pan. Then pour the caramel over the nuts. When you cut the caramel, the nuts help them keep their square shape, because they're so soft and squishy. Stick them in either the fridge or the freezer and dip them in melted chocolate. If it's really really hot and humid where you live, you should stick them in the fridge to set up. (it was way too hot in my house, and they stayed melted for a looooooong time)
:)
Thursday, May 20
Cookies with hazelnut filling.
I really felt like making something cute and adorable.
Logically, that leads to using little heart and star cookie cutters :)
Few things make me happier than tiny, shaped food. Haha.
I don't actually have much to say today, just trying to get through this summer of work and tiredness before I start my fall of school and tiredness. XD
I'm baking some cupcakes for my friends' birthdays, we're having a little get together tonight, and I figured I'd bring something. It's how I roll. :)
I was trying to figure out how to make some sort of cream filling made with hazelnuts, but I ended up whipping the cream and stuff so much, it turned into butter! Which, honestly, was not a bad result. :)

Simple butter cookies:
1 cup of flour
5 tbsp softened butter
3/4 cup of fine granulated sugar (run regular granulated sugar through a blender/food processor)
1 egg
1 egg yolk
pinch of salt
1/4 tsp of vanilla
Preheat the oven to 375 degrees.
Cream together the butter and sugar. Add the egg and yolk, one at a time, mixing completely, then add the vanilla. Afterwards, add in the flour and salt, and mix until a dough forms.
Let the dough chill in the fridge for about an hour, and then roll it out (very thin) and cut out shapes. Bake them for about 8 minutes, or until golden brown around the edges.
Let cool while making the filling.
Hazelnut "butter" filling:
1 cup of hazelnuts
1/4 cup of sugar
2/3 cup of milk
1/2 cup of heavy cream
2 tbs nutella (optional. you can also add melted chocolate)
Cook the hazelnuts, sugar, and milk in a saucepan over medium-low heat until the hazelnuts start to become translucent, and the milk takes on a light brown color (from the hazelnut skins)
Blend the hazelnuts and milk until slightly chunky.
Whip the mixture with the heavy cream and nutella until the butter separates from the liquid. (it'll take a while, but you'll see when it happens). Strain out the liquid using cheesecloth, or layers of paper towels.
To assemble, sandwich a bit of the butter between two cookies, and use your finger or the dull side of a knife to make the edges nice and clean.
I let mine sit in the fridge for a bit, so the butter wouldn't be as soft, but you can eat them right away if you want. :)
Saturday, May 8
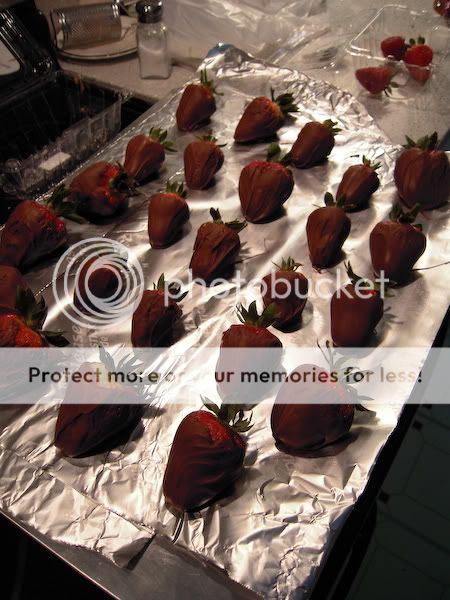
Chocolate Covered Strawberries...for Mother's Day
Because I once made chocolate covered strawberries for the mothers in my life, my father has roped me into doing it again.
Pretty simple stuff, but I figured I'd share what I was doing.
I used about a bag of Ghirardelli milk chocolate chips and made about 25 strawberries.
Just melt the chocolate, dip the strawberries, and decorate them if you want.
You can dip them in nuts, crushed cookies, sprinkles, or whatever!
I was going to drizzle colored white chocolate over them, but we didn't have any, so I made some royal icing and used that instead. :) Oh and I dusted them with gold pearl dust. Pretty! :)
The key to this is just using good chocolate (and good strawberries), and as far as supermarket stuff goes, Ghirardelli is boss. XD
So before I go to work, here are some pictures and stuff :P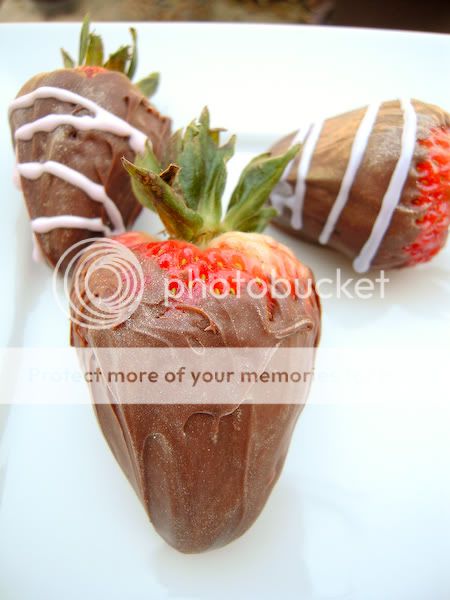
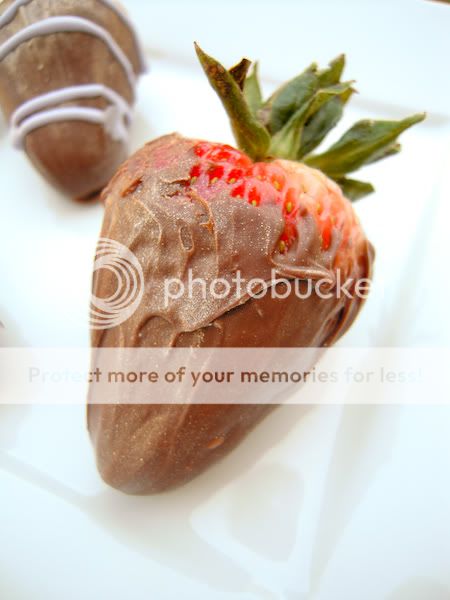
Chocolate covered strawberries:
1 bag of chocolate chips. (what, like...3 cups, maybe?)
25 strawberries (depends on size, I had a few giant ones, so you could probably do 30-35)
melt the chocolate over a double boiler, or in a microwave, making sure to stir it so it doesn't burn.
Dip the strawberries in the chocolate, and let them set on some nonstick foil or parchment paper. Either serve once set, or store covered in the fridge...but not keep them for too long, they get all goopy inside after a couple days XD
Enjoy! :)
Wednesday, May 5
Coconut cupcakes with pineapple filling.
And a condensed milk glaze.
I feel like I've taken a trip to some tropical island XD
I am not a huge fan of coconut, as my parents will readily tell you, but I think that my dislike for coconut stemmed from the texture of the shredded stuff. It's so gross! But the flavor of coconut doesn't bother me, as I've learned with these cupcakes.
It's even kind of good ;D
Haha.
So anyway, this idea came from some suggestions on flour on her nose's page on Facebook. I thought Mom had some coconut milk that I could swipe, and I knew I had frozen pineapple in the fridge.
When I went to get the milk, I saw that it was coconut oil instead! Which actually worked out rather well, since we were low on butter.
So in this recipe, I swapped out the butter for coconut oil (it's in a solid state), and just used regular milk, but if you can only get the milk, just switch out regular milk for coconut milk and use butter instead of oil.
I don't know what happened, but the filling wouldn't thicken! So I got the harebrained idea of trying to turn it into pineapple rice pudding, but then I think the starch from the rice helped thicken it too much before the rice got to cook! I had to push it through a sieve to get all the uncooked rice out XD
I'll say exactly what I did, though, so you can at least get the same results.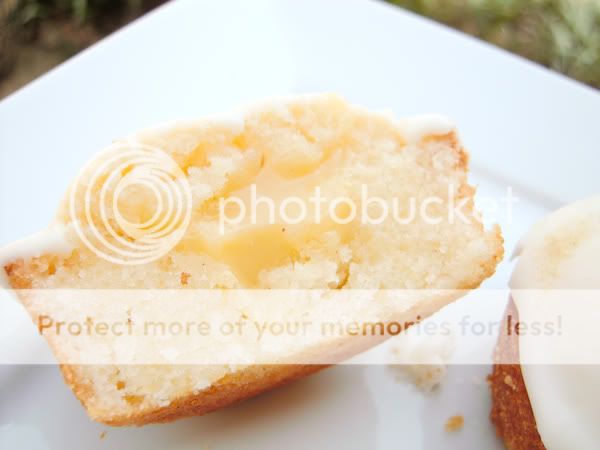


Coconut cupcakes with pineapple filling and condensed milk glaze (whew):
Coconut cupcakes: (makes 6)
1 c flour
2 tbsp corn starch
pinch of salt
3/4 tsp baking powder
4 tbsp coconut oil (or soft butter, if you're going to use coconut milk)
1/2 cup sugar
1 egg
tiny bit of vanilla
1/4 cup of milk (or coconut milk, if you're using butter)
Preheat the oven to 400 degrees Fahrenheit.
Mix together the flour, corn starch, baking powder, and salt. Beat in the coconut oil/butter until it makes a kind of thick paste. Beat in the sugar.
Beat in the egg until fully combined. Add the vanilla and milk.
Put the batter in lined cupcake tins, and bake for about 20 minutes. (do the toothpick test!)
Pineapple filling:
1 egg
2 yolks
1/3 c pineapple puree (strained)
2 tbsp lemon juice
4 tbsp butter
1 cup sugar
3/4 cup milk
1/2 tsp ginger
1/2 tsp cinnamon
(maybe a bit of cornstarch)
(and randomly, a cup of rice, haha)
Put a stainless steel bowl over a simmering pot of water, or use a double boiler. Whisk together the egg and the yolks, then add everything else but the rice. Mix it over med-low heat until it's thick. If it doesn't thicken, add a little cornstarch and keep mixing. If that still doesn't work, go ahead and add the rice and let it get nice and thick. Once it's thick, push the filling through a sieve to get rid of all the rice. Let it cool.
To fill the cupcakes, take a sharp knife and cut a cone out of the top of the cupcake. Cut off the pointy bit of the cone, just leaving a small cover. Fill the cupcake with the pineapple filling, and place the "lid" over the filling.
Then mix some condensed milk with powdered sugar (as if it wasn't sweet enough ;)) until it's really thick, but still spreadable.
Frost/glaze the cupcakes and enjoy!![]()

Friday, April 23
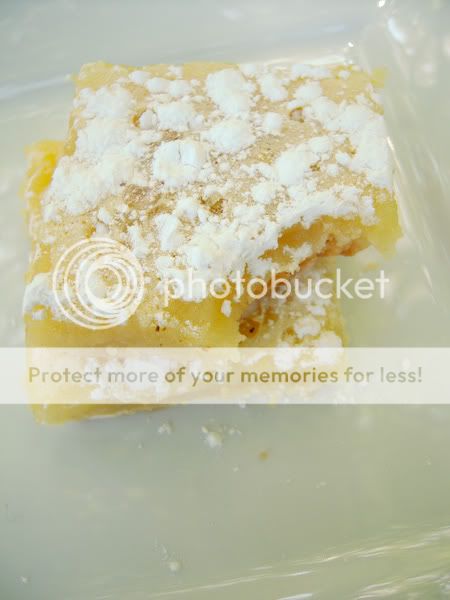
OH MY GOSH, SHE'S BACK. With Lemon Bars. :O
Yes yes, I've been neglecting this blog horribly.
My job just saps all of my energy, and that leaves me highly unlikely to feel up to baking anything, much less photographing and blogging it. But I've found the strength today!
We had this bag of lemons left over from some project a couple of weeks back, so I figured I'd make something to use them up.
Logically, I decided to make lemon bars. :)
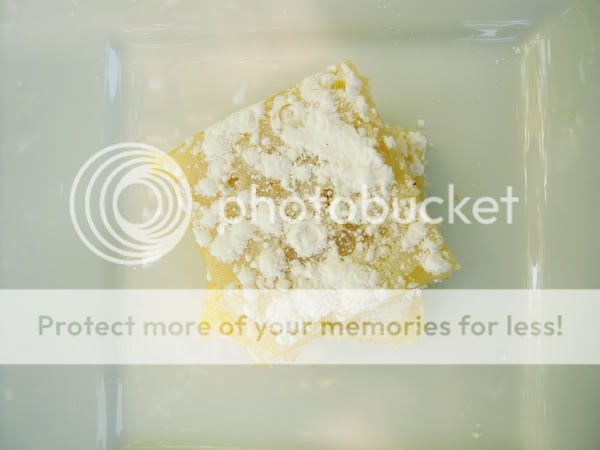
I got impatient and didn't bake the crust long enough, so make sure that you do manage to get it nice and golden brown.
Anyhoooooo, let's just get to the pictures and the recipe. Hopefully this'll lead to me posting much much much more often :)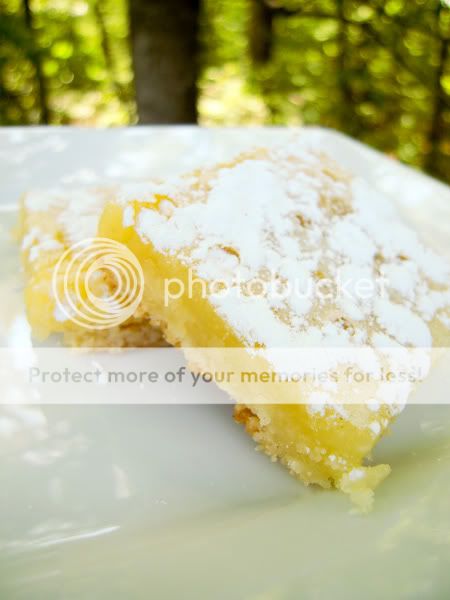
Lemon Bar:
Crust: 1 3/4 cup flour
2/3 cup sugar
1/4 cup cornstarch
1/2 tsp salt
12 tbsp butter ,cut up (cold, but let it sit on the counter for a couple of minutes)
Preheat your oven to 350 degrees Fahrenheit.
Beat together all the ingredients until the dough starts to come together, but isn't like a typical ball of dough. (still a little crumbly)
Press the dough into a 13x9 (or smaller for a thicker crust) pan that's lined with parchment paper.
Refrigerate it for 10-20 minutes, and then bake it for 20 minutes, or until golden brouwn.
While that's baking, get started on the filling.
Lemon filling:
3 eggs
1 3/4 cup sugar
1 tsp lemon zest (you can add more if you like, it adds more flavor, but I'm not the biggest fan of biting into zest)
1/2 cup lemon juice (for a fun twist, replace 1/4 of the lemon juice with another fruit juice or a fruit puree)
1/4 cup flour.
Whisk together all of the ingredients, and then pour over the warm crust.
Place the pan back in the oven and bake for 30-35 minutes, until set.
Let cool completely, cut, and sprinkle with powdered sugar.
Enjoy! :)
Tuesday, February 23
Hmmm...
I just got a job at the movie theater, so I'm going to have to see how this affects my posting. (I know, it's slowed down already, but money's a bit tight to be making random things...which this job will help with! XD)
Anyway, just thought I'd mention it, so you know I'm not dead or anything ;)
Thursday, February 18
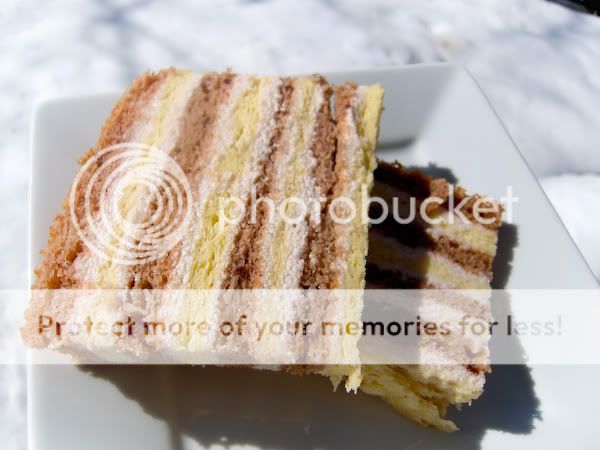
Chocolate & Vanilla Sponge Cake with Strawberry Buttercream
Yet another mouthful, ha.
After a string of unsuccessful submissions to foodgawker and tastespotting, I wanted to make something that was visually stunning. (and not impossible to execute, haha) Stumbling through the food blogosphere (oh how I hate that term, haha), I came upon this cake.
I made some changes, and had to improvise (as English isn't the blogger's native language, and some things weren't entirely clear)
Anyway, it's really pretty, but there's too much frosting between the layers for me, so I'd either put less in between each (which would make the frosting less visible :( ), or make the layers thicker and just have 4 instead of 8 (which is also less pretty). But if you're a big frosting fan (and it IS good), then just go ahead and use as much as you want.
I definitely think one of the keys to the beauty of the cake is the clean lines, so definitely try to bake the layers evenly, and to trim the sides of the cake.


Sponge cake recipe:
Adapted from Cafe Chocolada
6 eggs, separated.
1 cup sugar
3/4 cup oil
3/4 cup milk
1 cup flour
4 tsp baking powder
1 tsp vanilla
2 tsp cocoa powder
Preheat oven to 395 degrees Fahrenheit (Yup!)
Line a pan or two (I only had one -___-)with parchment paper, and lightly spray with nonstick spray. I used a half sheet pan (so I could just cut the one layer into 4 pieces), but you can use any sort of pan you want, and just split the layers in half.
Beat the eggs whites until stiff. While that's happening, whisk together the yolks and the sugar, until thick and lighter in color. Whisk the yolks into the whites.
Then add in the oil, vanilla, milk, flour, and baking powder and mix until totally combined (the oil is tough, but whisking helps instead of just using a spoon or spatula).
Put half of the batter (don't freak out if it's all bubbly and rising) into the pan, making sure to level it really well. While that's baking (for about 10-15 minutes), put 2 tsps of cocoa powder into the remaining batter. Make sure there's no clumps or it's really hard to incorporate.
Bake that cake.
Once the cakes cool, peel off the parchment paper and cut them in whatever desired shape. I wrapped them up and stuck them in the freezer while I made the frosting.
Strawberry Buttercream Frosting: (not my swiss stuff! haha)
1 cup milk
1/4 c flour
1/4 c sugar
1/3 c strawberry puree (I used the juice from some frozen strawberries)
1 stick of unsalted butter, softened.
Combine 1/2 cup of the milk with the flour, and heat slightly over medium heat, whisking. When it starts to thicken a little, take it off the heat. Bring the rest of the milk to a boil, with the sugar and the strawberry puree. Turn the heat to medium-low, and add in the flour/milk mixture. Whisk it continuously, cooking it until it's thick.
Take it off the heat and let it cook completely.
Then, beat in the butter.
My cake assembly:
I cut each cake into 4 equal pieces and stuck them in the freezer while I made the frosting. After layering the cake + frosting, I set the cake in the fridge overnight, and then trimmed off the edges to make a nice rectangle.
Bring it to room temperature before serving. :)
Thursday, February 11
Kiwi Curd Tarts with Strawberry Mousse: A Mouthful in More Ways Than One
Good grief, that was a long title. XD
At the store the other day (you know, stocking up before the big storm), I grabbed a few kiwis because...well, just because. You know how that is, wandering around the produce section and randomly deciding to get something, even though you have no clue what you'll use it in.
When I got back, I started looking through cookbooks, just to get an idea of something to do, and I saw this recipe for a lemon curd tart.
I'm sure we can all make the OBVIOUS leap from lemon to kiwi, and so to kiwi curd, haha.
I wasn't entirely sure if it was possible, and a quick google search was less than fruitful (pun originally not intended.)
So I figured I'd replace the lemon juice with kiwi puree + a liiiiittle bit of lemon juice. I couldn't quite tell that it was kiwi I was tasting, but it was definitely different from a regular lemon curd.
UNFORTUNATELY, when developing your own recipes/methods, timing is very important...By the time the tarts were fully cooked, the crust was rather dark...which was sad. But honestly, it was really good, a nice carmelized flavor. And the method of making it is like a cookie, so...that's how it tastes. Next time I'll probably not prebake them, so I'm going to add that into the recipe.
Then, just to make them prettier, I added a strawberry mousse topping. Strawberry kiwi used to be my favorite Capri Sun flavor when I was a kid, hahaha, so it seemed fitting.
Both of these recipes are fairly labor intensive, but it was definitely worth it. :)
Strawberry mousse with blueberries
Mostly done kiwi curd tarts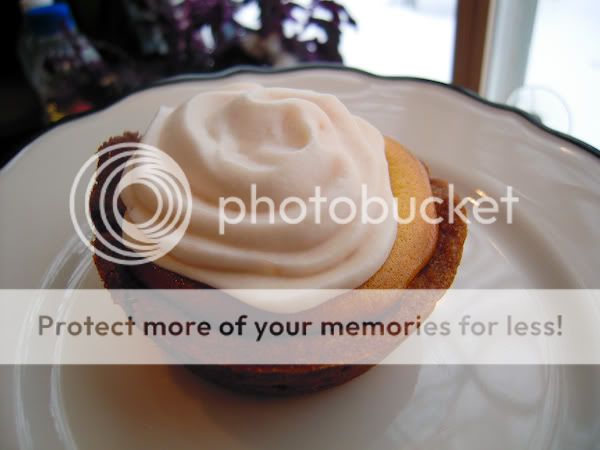
They may look burned, but they were actually really good (and no burned taste! haha)
See? Yummy
The mousse was perfect with the curd :)
Kiwi Curd Tarts:
[Crust]
8 Tbsp butter
3/4 cup sugar
1 large egg yolk
1 cup flour
pinch of salt
Cream together the butter and sugar until light and fluffy. Add the yolk, and beat for about 2 more minutes. Beat in the dry ingredients on a low speed. Form into a disc and refrigerate for at least 2 hours.
Now you can either make about a dozen mini tarts (I use my cupcake tin) or one big one. Either way, shape the crust in whatever tin you use, and stick it in the freezer or the fridge for a bit (it's a VERY soft dough)
[Kiwi Curd]
(This makes much more than I used for the recipe, but it's just easier this way)
1/2 cup of strained kiwi puree
6 egg yolks
juice from 1/2 a lemon
1 egg
1/2 cup of sugar
pinch of salt
8 tbsp butter.
Over a double boiler or a bain marie or whatever you use for stuff like that, whisk together the yolks, egg, and sugar. Add the vanilla, puree and the salt and whisk it until it's really really thick and lightened considerably in color. (trust me, you'll know when it's done).
Strain it and let it cool until it's just barely warm to the touch. Then, whisk in the butter.
Spoon the curd into the prepared crust and bake at 325 degrees Fahrenheit for about 15 minutes, but depending upon the size/thickness of the shape you choose, it may take longer. Cook it until the center is set (stick a toothpick or something in the middle, if it's clean, it's good).
Let cooooool.
Now, if you want, you can top it with strawberry mousse, or whipped cream or anything.
Strawberry Mousse:
(this also makes more than I used for the tarts, but it taste great on its own anyway, hehe)
1 tsp gelatin
2 tbsp cold water
3/4 cup of milk
1/2 tsp vanilla
2 egg yolks
1 1/2 tbsp sugar
1 1/2 tbsp corn starch
1/4 cup of strained strawberry puree
1 cup of whipped cream
Bloom the gelatin over the cold water.
Boil the milk and vanilla. While that's happening, whisk together the egg yolk, sugar, and cornstarch. Carefully stream the hot milk in to the yolks, whisking furiously the whole time. (don't want to scramble the eggs). Cook the mixture until it's thick (which should not take long. I put the pot on the stove, turned to get the puree from the fridge, and when I got back to the stove, it was thick!). Whisk in the puree and cook for about 30 seconds. Then add in the gelatin, making sure it's totally melted in the mixture. When it's cool, fold it into the whipped cream.
Top the tarts with it, or pipe (or spoon) it into glasses and let it set in the fridge for an hour or so.
Enjoy! (it tastes like ice cream, yum!)
[also, I'm pretty sure I got everything, but if anything's unclear, don't hesitate to ask me!]
Monday, February 8
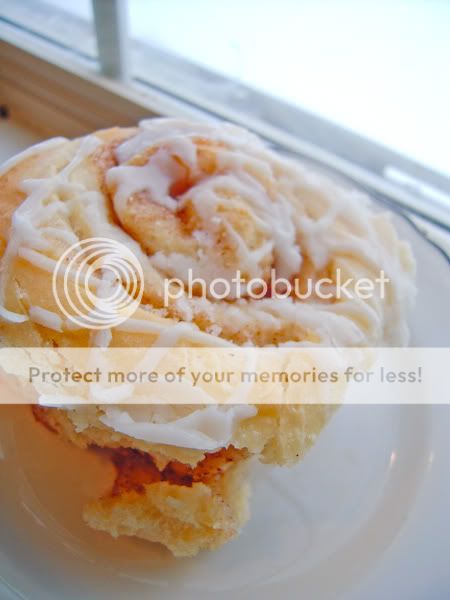
Snowpocalyptic Cinnamon Rolls
Okay, so if you live in the the eastern United States, especially the mid-atlantic, you're well aware of the chaos that occurred outside.
It snowed.
I know, crazy, right?
No, it didn't JUST snow. It was ridiculous. I don't know the last time Virginia's gotten this much snow. It was definitely at least 2 feet in places. With my mother heading off to work in Maryland at 2 AM, I knew I'd have to help my poor old father (haha) shovel the aftermath.
At around 3 am, I got the brilliant idea of starting some cinnamon rolls to surprise him.
While I waited for the dough to rise, I got some pictures of the sunrise (okay, well a little off, since the sun rises to the right of our house, where there are no windows haha) through the snow covered trees.

I shoveled from the front door to the garage, then posed for a picture
It's okay, you're allowed to think I'm kinda awesome.
Then I complained a lot and went inside. I have a short attention span when it comes to menial labor XD Luckily for Dad, a neighbor has a snowblower that he let him borrow. Yay, neighbors! :)
ANYWAY, I suppose you would like a recipe and some pictures of cinnamon rolls, yes? Fine, fine.


I halved this, by the way, since it was just me and Dad
Cinnamon Rolls:
6 tbsp granulated sugar
5 tbsp butter, room temperature
1 teaspoon of salt
1 egg, beaten
2 tsp yeast
3.5-4 cups of flour
1 cup of milk (either room temperature, or slightly warm..not hot!)
2-4 tbsp of melted or very soft butter
1/2-3/4 cup of cinnamon sugar mixture (you can combine them in any ratio you want, and you can add as little or as much as you want, really)
Cream together the butter, sugar, and salt. Add in the egg and beat until smooth.
Add in the yeast, flour and milk. Mix it until it forms kind of a ball.
If you have a standing mixer with a dough hook, switch to that afterward and let it go on medium speed for about 10 minutes. If not, well, oil or flour your hands very well and knead, because this dough is a bit sticky.
Put the dough into an oiled bowl, cover, and let it rise for 2 hours, or until it's doubled in size.
Roll out the dough(thickness is up to you :) ) and spread the melted or softened butter on it. Sprinkled the cinnamon sugar all over it, and tightly roll it up. Cut 1-2 inch rolls, depending on the dimensions on the pan you bake them in. Let them rise for another hour to an hour and a half. Alternatively, you can wrap them and let them rise in the fridge overnight.
Preheat the oven to 350 degrees Fahrenheit.
Bake the rolls for about 20-30 minutes
Drizzle (or drench, hehe) a glaze made of milk, powdered sugar, and vanilla over them. (It's difficult to give a recipe for the glaze, because I swear, I can use the same measurements each time and get a different consistency. Just make sure to add the milk to the sugar little by little. It's very easy to get a glaze that's too thin)
Enjoy! :)

